
Field Labelling Wizard
Quickly and easily label your fields in Zuko using the Labelling Wizard
An important part of setting up Zuko is to label and configure the fields that appear in your form. Most fields will display with a default label, which is based on the name, ID or type of field, but not all fields will have names or IDs that can be easily matched to the real life field label.
We offer several ways for you to configure your form fields. The easiest way is to use the interactive field labelling wizard. With this tool, you are able to view your form – as a visitor would – and label each field as you click through your form.
If you prefer using the original manual method to label your form fields you can read this guide.
To get started with the wizard, log in to the Zuko app and select one of your forms from the dashboard. Then select the cog icon in the top right-hand corner of the page, next to the form’s label. Then select the Label Fields tab and then click on the button to launch the labelling wizard.

Select the field labelling tool, then click the button Launch Field Labelling Tool. This will open up your form in a new tab, and the field labelling tool will open in the bottom right-hand corner of the screen.

If you’ve selected the button to open the tool and your form has opened up but the tool isn’t visible, you might want to check the following:
- Is Zuko tracking installed and running correctly on your form? The form labelling tool will only work if Zuko tracking is trigering on your form. Check this guide to get help with this.
- Does your site have a Content Security Policy (CSP) which might be blocking Zuko from loading the tool on your form? You might need to speak to your development team to allow this.
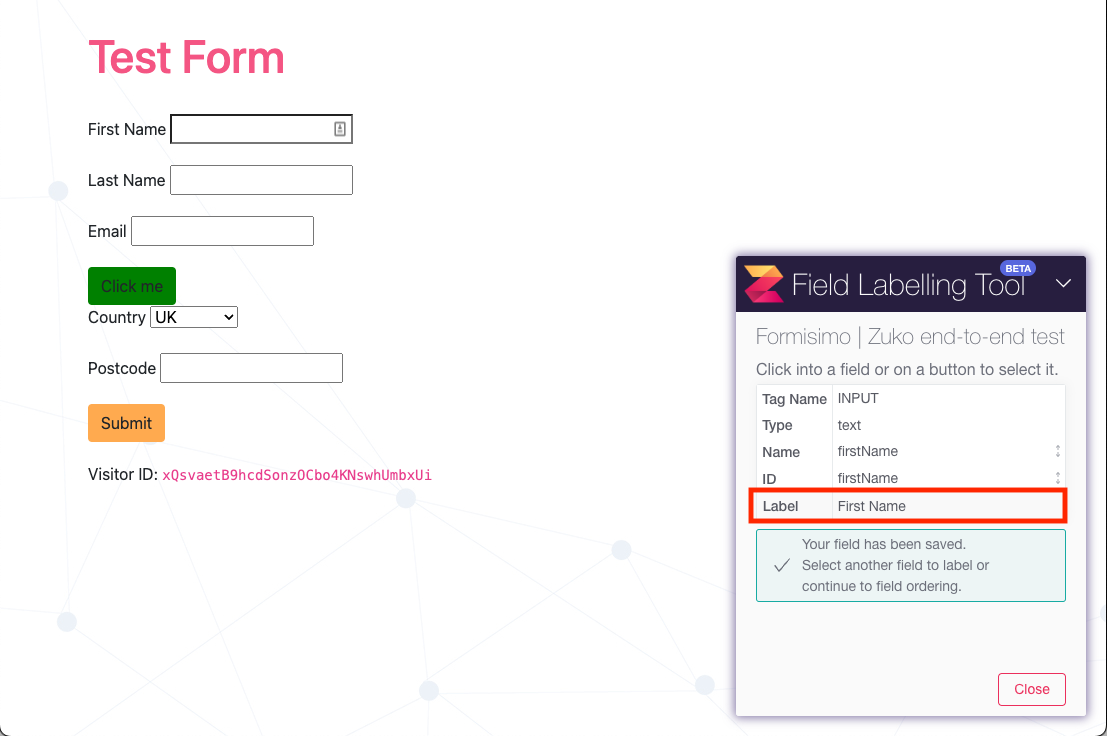
From here, you can then click on each field in your form, and the labelling tool will be populated with the field that you selected. You can set the label for this field, by entering it in the Label field. When you’re happy with the label you’ve entered, click on the Save Label button. Repeat this process for each field in your form.
When you have labelled all the fields in your form, click the close button in the tool. You will then be taken back to the field labelling wizard in the Zuko app, where you can adjust the order of the fields in your form. You can skip this step if you’re happy with the ordering of the fields.

After this, you have the opportunity to hide any fields on your form that you do not wish to view in the reports. You can skip this step if you do not have any fields that you would like to hide.

The last step is to confirm the fields that you have configured. If everything is as you want it, select the Done button.

That’s it! You’ve labelled your form fields. Any labels, ordering and hiding that you’ve done will take immediate effect and reports will show this information right away.

If you would prefer to not use the visual tool (or if your company's CSP blocks it), you can select the Unconfigured Fields List button on the right hand side of the first Wizard page. You can then label the fields based on their HTML Name or ID and follow the rest of the steps above.
Want to get started with Zuko?
Start a free trial that includes all features, or request a demo